Whether you are setting up your first home security system or switching from another provider, this guide walks you through every step of installing an ADT security system, without the confusion or sales pressure.
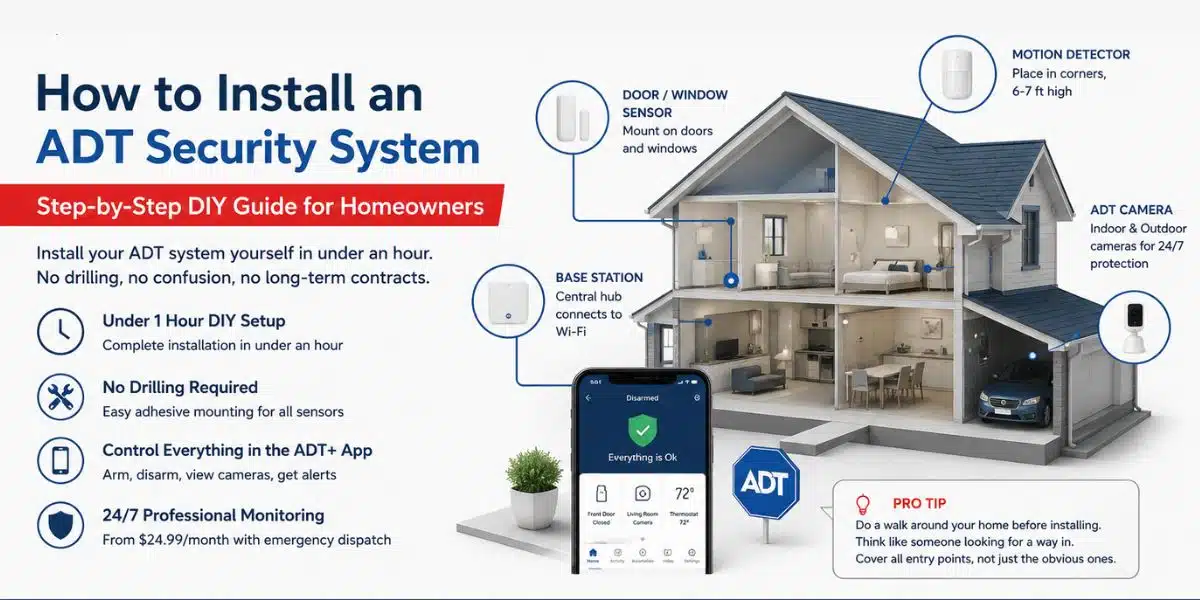
Home security used to mean calling a technician, clearing a half-day for them to show up, and signing a long contract before you even knew if the system worked for you. ADT has changed that. Today, you can install a complete ADT security system on your own, in under an hour, with no heavy tools and no long-term commitment — or you can still go the professional route if you prefer.
I have gone through this process myself and spoken with homeowners who have done both. This guide reflects what actually works, what catches people off guard, and how to avoid the common mistakes that lead to false alarms, missed zones, or a system that does not connect properly.
DIY vs professional ADT installation: which one is right for you?
Before anything else, you need to pick your setup path. ADT offers two options: ADT Self Setup (their DIY route) and ADT Pro Installation (where a certified technician comes to your home).
The DIY path is genuinely simple for most homes. Equipment ships directly to your door, and the ADT+ app guides you through the whole process. You do not need to drill anything or run wires — the sensors mount with adhesive pads, and the base station just plugs into a power outlet and connects to your Wi-Fi.
Pro Installation makes sense if you have a larger home, want wired cameras, or just prefer having an expert set everything up and test it for you. ADT technicians will also do a walkthrough with you to identify the best placement for each device before installing anything.
A third option that many people overlook: if you start the DIY process and get stuck, ADT offers Remote Assistance. A live specialist will walk you through everything over a video call. This is a good middle ground if you want control but do not want to figure it out alone.
What you need before you start
A smooth installation comes down to preparation. Here is everything to have ready before you open the box.
- A working Wi-Fi connection (the base station connects via Wi-Fi to send alerts)
- Your Wi-Fi network name and password
- The ADT+ app installed on your phone (available on iOS and Android)
- Your ADT account credentials set up before the technician or equipment arrives
- A plan of your home — know which doors and windows you want to cover
- If using Google Nest products, a Google account and the Google Home app
- Permanent power outlets accessible where the base station and cameras will live
Pro tip
Do a quick walk around your home before unboxing anything. Think like someone looking for a way in — weak side doors, windows hidden by hedges, basement entry points. This mental exercise helps you place sensors where they actually matter, not just the obvious front door.
Step-by-step: how to install an ADT security system yourself
1 Set up your ADT account and download the app
Create your account at ADT.com before the equipment arrives. Download the ADT+ app and log in. This app is your control hub it is how you arm and disarm your system, view camera footage, and receive alerts. Do not skip this step or rush through it; a misconfigured account is the most common reason setups fail on day one.
2 Place and power on the base station
The base station is the brain of your system. Place it in a central location in your home — not a closet, not the basement. It needs to reach all your sensors wirelessly, so central placement matters. Plug it into a power outlet, connect it to your Wi-Fi network through the app, and wait for it to go online. You will see a confirmation in the ADT+ app when it is connected.
3 Install door and window sensors
Each sensor comes in two parts: one goes on the door or window frame, and the other goes on the door or window itself. They should sit no more than a quarter inch apart when the door or window is closed. If the gap is wider, the sensor will read as open even when it is shut — triggering false alarms. Clean the surface before attaching, let the adhesive set for a few minutes, and test each sensor through the app before moving on.
4 Mount motion detectors in the right spots
Motion sensors work best in corners, placed about six to seven feet high. They cover a wide angle from that position, which means fewer blind spots. Avoid placing them near vents, heating units, or windows where sunlight or temperature changes can trigger false alerts. Pets under 40 pounds generally do not set off ADT’s motion sensors when positioned correctly, but aim the sensor slightly upward if you have larger pets.
5 Set up your cameras
ADT Self Setup uses Google Nest cameras — both indoor wired and outdoor battery options. For outdoor cameras, position them to cover entry points like your front door, driveway, back gate, or any area with low visibility from the street. Shaded areas and spots with heavy shrubs are the ones burglars prefer. Mount cameras at about eight to ten feet high so they capture faces clearly without being easily grabbed or blocked. Connect each camera to the app and confirm the live feed is working before moving on.
6 Test the full system
Before you go live, put the system in test mode. You can do this through the ADT+ app or by calling ADT directly. In test mode, triggering sensors will not dispatch emergency services, so you can safely open doors, walk in front of motion sensors, and make sure every device is communicating with the base station. This step is non-negotiable — skipping it means you might discover a missed sensor at 2am when an alarm goes off unexpectedly.
7 Activate professional monitoring
Once you are happy with the setup, activate your monitoring plan. ADT Pro Monitoring starts at $24.99 per month and includes 24/7 monitoring with emergency dispatch. If an alarm is triggered, ADT’s team verifies the alert and contacts emergency services directly no phone call required from you. This response time is one of the biggest advantages of a monitored system over a self-monitored setup.
Where most people go wrong during installation
After looking at dozens of homeowner experiences with ADT setups, a few mistakes come up again and again. These are worth knowing before you start.
The most common issue is poor sensor placement. Putting a door sensor on a warped door frame, or placing a window sensor on a window that does not close flush, will cause constant false alarms. Check every door and window physically before placing any sensor.
Connectivity problems are the next big one. If your Wi-Fi signal is weak where the base station sits, alerts will fail to send. A simple fix is to move the base station closer to your router, or use a Wi-Fi extender if the home is large. ADT requires upload speeds of at least 2 Mbps per camera, so if you have four cameras, your internet connection needs to support 8 Mbps of upload on top of your normal usage.
Watch out: Do not place the base station in a cabinet, drawer, or any enclosed space. It needs an open area to communicate with sensors throughout the home. Enclosed placement is one of the most overlooked reasons systems develop dead zones.
Another issue is forgetting secondary entry points. Most homeowners cover the front door and maybe the back. But garage side doors, basement windows, and patio sliders are often left unprotected. Go around your home and think like someone who does not want to be seen from the street.
How ADT monitoring actually works after installation
Once your system is live, it communicates with ADT’s monitoring centers around the clock. ADT operates the largest network of company-operated monitoring centers in the industry, which means there is always someone watching your signal, regardless of the time.
When an alarm is triggered, monitoring agents receive the alert, verify whether it is a real emergency (on higher-tier plans, they can briefly access camera footage for this), and contact emergency services directly. This skips the step of you having to wake up, assess the situation, and make a call under pressure.
You control everything through the ADT+ app. You can arm and disarm the system remotely, check live camera feeds, review event history, and set automation rules with Google Nest devices. If you have a Google Nest thermostat or Nest doorbell, those can be integrated into the same ecosystem.
Watch this step-by-step ADT security system installation video to see the complete DIY setup process in action.
Frequently asked questions about ADT installation
How long does it take to install an ADT security system yourself?
Most homeowners complete the full DIY setup in under an hour for a standard package. Larger homes with more devices may take two to three hours, especially if you are being thoughtful about placement and testing each device individually.
Do you need to drill holes for ADT sensors?
No. ADT Self Setup sensors use adhesive mounting pads — no drilling needed. Outdoor cameras may require mounting screws if you prefer a permanent installation, but battery-powered cameras can also be mounted without drilling in many cases.
What happens if the power goes out?
The ADT base station has a built-in backup battery that keeps the system running during power outages. The system will continue to communicate over cellular backup as well, so monitoring is not interrupted if your internet goes down along with the power.
Can you install ADT in an apartment or rental?
Yes. Because the sensors use adhesive mounting, there is no damage to walls or frames. The system is also easy to uninstall and take with you when you move, which makes it a practical choice for renters or people who expect to relocate.
What if you need help during setup?
ADT offers Remote Assistance where a live specialist walks you through the setup over a video call. You can also reach PHT Security directly at (281) 272-5276 — as an ADT authorized dealer in Houston, we are happy to guide you through the process or send a technician to your home.
Final thoughts
Installing an ADT security system is far less intimidating than it used to be. The equipment is designed for people who have never set up a security system before, and the app-based setup process takes you through each step without requiring any technical knowledge.
The key is to take your time with placement, test every device before going live, and think through your home’s actual vulnerabilities rather than just covering the obvious entry points. A well-placed system with five sensors outperforms a poorly placed system with twenty.
Whether you go DIY or bring in an ADT technician, you are getting the same underlying monitoring infrastructure that has protected homes for over 150 years. The setup method is just how you get there.
Ready to Protect Your Home?
PHT Security installs ADT systems across Houston. Get expert installation, 24/7 monitoring, and local support — starting at just $36.99/month.
No long-term contracts required · Licensed & insured · Same-day appointments available